Print the UV Air Cleaner Installation Instructions
Observe all warnings and cautions. Read the
complete instructions before beginning of installation.
American-Lights® UV Air Cleaner must be installed by authorized and qualified
technicians. This fixture is designed for use with germicidal lamps and must be
installed in compliance with competent technical directions so the user's eye
and bare skin will not be subjected to ultraviolet rays.
WARNING!
NEVER expose eyes or skin to UVC light from any source.
NEVER operate this unit outside of plenum.
Before installing or servicing this unit, ALWAYS turn off the power supply and
unplug the power cord.
Electrical shock can cause personal injury or death.
WARNING! Do not mount in direct line-of-sight of openings in the duct or any
access panels of a product connected to the duct.
CAUTION: Do not mount in close proximity to plastic coated wiring regardless
of their UV protective coating or in direct line-of-sight of plastic
materials. Do not mount closer than 36" from any plastic air filter
(fiberglass and metal filters are safe).
CAUTION: Equipment Damage Hazard. Ultraviolet light can cause color shift or
surface degradation and sometimes - structural degradation of non-metallic
components. Select mounting location that prevents exposure to plastic
flexible duct components, polyurethane foam insulation material, rubber hoses,
wire insulation, etc. If mounting options are limited, items above should be
protected with ultraviolet resistant material such as aluminum foil, aluminum
duct tape, or metallic shields or the equivalent.
FOLLOW ALL LOCAL CODES AND REGULATIONS WHEN WIRING THIS
UNIT.
NOTE! DO NOT install the UV lamp close to a grill if its “night light” effect
will be objectionable.
Disconnect power before removal or
lamp replacement. Proper installation should have UV lamps at right angles to
air flow, centered in duct or plenum. The UV Air Cleaner should be installed
at least 36" away from plastic air filters. The air cleaner can be placed on
either supply or return side of the coil and is equally effective. Note: if UV lamp is installed close to register or grill, the ultraviolet light may cause
objectionable night glow effect.
Step-by-step UV Air Cleaner Installation Instructions:
UV lamp replacement: requires original American-Lights AAWHO/14 germicidal UV lamp, obtained from your
authorized dealer. Other UV lamps are incompatible and may damage the air cleaner.
- Establish a location, not less than 36" from plastic air filters, for installation on the RETURN or SUPPLY SIDE of the air handling
system. The best location is over the coil so UV can keep it clean of microbial contamination and growth, including mold growth. The proximity of an
available power source should be also considered when selecting the mounting site.
- After determining the best position, remove the 2 Philips screws on the top of the cover, remove the American-Lights® cover and place
the housing assembly against the exterior wall. Use it as a template for transferring the mounting holes as well as the entry holes for the UV lamp.
Drill one 1" hole for the UV lamp.
- Mount the air cleaner chassis to the duct by fastening the self tapping screws or the longer screws for duct board.
- To install the UV lamp, slide the UV lamp through the hole in the unit and duct until the retaining ring will not allow further
insertion. Slide retaining clip over retaining ring and tighten the retaining clip’s fasteners so it will not move. Carefully attach the plug to the 4-pin
end of the lamp.

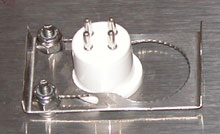
- Replace the cover and tighten the screws. Do not pinch or cut any wires.
- Drill a 7/16” hole in the duct 6 inches away from the mounting position of the UV lamp. Insert the indicator plug in the hole. When the lamp is lit, the
plug will glow as an indicator that the unit is working correctly.
- Attach the Warning Label on the duct next to the installed UV Air Cleaner.
- Power the unit – the UV lamp will come on instantly.
- For best results: leave the UV air cleaners ON at all times with the HVAC fan running continuously for the first 2 weeks by
turning the thermostat switch to the ON position. After that the UV air cleaner should continue to stay ON but the fan can be switched to
the AUTO position.
Print the UV Air Cleaner Installation Instructions
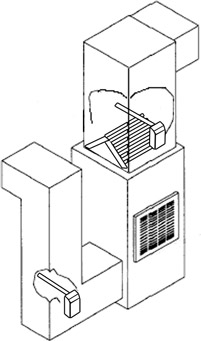
The American-Lights® High Output UV Air Cleaner is the strongest UV air cleaner available on the indoor air-quality market in its range.
The air cleaner requires a minimum of rules for a productive installation:
Best air cleaner installation location is over top of the "A" coil
at a right angle to the “A”.
The air cleaner could be installed in the
return plenum if the UV lamp is not in direct sight of air filters, louvers, etc. (the user should not be able to remove the air filter and see or
touch the UV lamp).
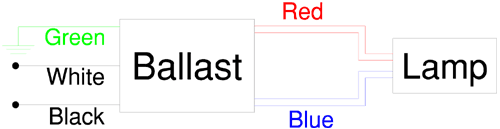
The American-Lights® UV air cleaners ship completely assembled and factory
wired. The ballast wiring diagram is provided for reference only. If any
concerns with the original wiring occur please call us for technical assistance.